Organizing Class Work
This app is part of your Office 365 for Education subscription as a Home-Schooler.com member. While this app can be used in the typical home-school setting, it is especially helpful for group learning, such as Co-ops and Enrichment Programs.
Below the next section you will find a 10 minute video, produced by Microsoft, which highlights the app. Below that you will find a Transcript which will help identify sections of the video you may wish to jump to or replay.
Benefits for Students and the Teacher
OneNote Class Notebook in Office 365 for Education offers several benefits for both the teacher and the student(s):
1. Organized / Centralized Content Distribution: The teacher can store and distribute handouts, assignments, and other materials to students efficiently. Each student gets a personal workspace, while the teacher can share content in the collaboration space for group activities. The Content Library lets you (and the student) store popular file types including Documents, Images, Videos, Audio Files, Templates, Links, and Forms.
2. Real-Time Collaboration: Students can work together on projects and assignments in real-time. The teacher can also provide instant feedback and support, making the learning process more interactive and engaging. This can also be shared among many students (such as in a co-op or enrichment setting) for group projects.
3. Personalized Learning: Teachers can tailor content and assignments for an individual student’s needs. Each student’s progress can be monitored and you can provide individual feedback, helping the student learn at their own pace.
Video Transcript
INTRODUCTION
It’s easy to work together with other people using OneNote. For teachers, that means being able to collaborate on class projects, share assignments with students, and provide feedback on student work.
The OneNote class notebook app lets teachers quickly set up notebooks with pre-assigned permissions designed for classroom use. Let’s take a look.
LAUNCHING THE APP
00:33
From Office 365, click or tap the app launcher.
Next select class notebook.
To get started, click or tap Create a class notebook.
Next, give the notebook a name.
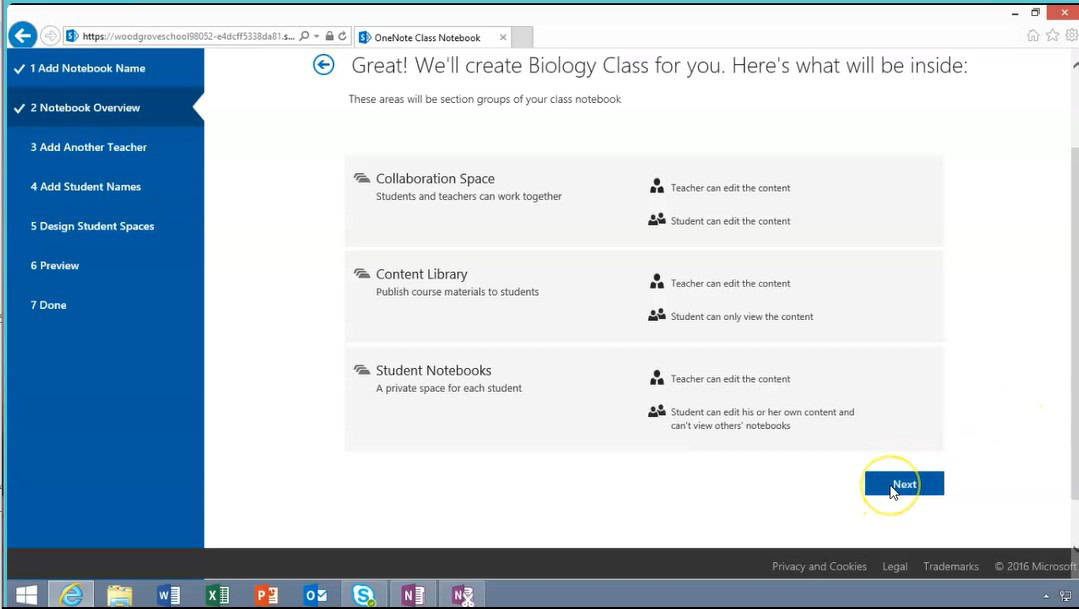
The OneNote Class Notebook app provisions a notebook with three section groups, each with its own unique permissions:
- The Collaboration Space allows both teachers and students to edit content. This is great for shared group or classroom projects.
- The Content Library allows teachers to edit content, but students can only view or copy the content. This area can be used for distributing tests, assignments or other course materials to students.
- Student Notebooks provide a private space for each student to work. Teachers can view and edit each student’s notebook, but students can only see their own.
Click or tap next to continue.
You can share your notebook with other teachers or staff in your organization. We’ll explore this feature later in the guide.
Adding Students To A Notebook
02:00
For now, click or tap next to skip this step you can add students to the notebook individually or as a group, such as a group that includes all students in a class. Groups must be set up in Azure Active Directory or Office 365.
To add a group, simply type part of the group name and then select it from the list. Group membership changes after the notebook is created. You can return to the OneNote class notebook app and click through the add or remove student steps to synchronize the changes.
In this case, rather than adding a group, let’s add students individually.
02:41
Enter the names of your students. Each student will be assigned his or her own student notebook within the class notebook.
Student notebooks contain a few default sections. You can add additional sections or simply click or tap next to accept the suggestions.
Before you create the class notebook, you’re provided with a preview. Let’s Scroll down to take a closer look. These are the notebook sections the teacher will see.
Click or tap Student’s Notebook. This is what students will be able to see. Click or tap Create. OneNote begins provisioning and configuring permissions for the teacher notebook and each of the student’s notebooks. When provisioning is complete, you’ll see a link to the new class notebook.
Send the link to your students. This is how they’ll access the notebook. You can also open the notebook directly from here.
03:52
Now you can get started adding your course materials and taking notes using the specially designated sections to collaborate and share content with your students.
If at any time you need to add or remove students or teachers, simply return to the OneNote class notebook app.
Click or tap add or remove students. Select the notebook from the list. In this case we only have the one.
You can add one or more students by typing their names here, or remove individual students from the existing student list.
When you remove a user, any content he or she added remains in the notebook, but that user no longer has access. In this case, you’ll enter one student’s name to add him to the notebook, and then click or tap next. If everything looks OK, click or tap update. Once again, the app provides a link to the notebook so you can give it to the new student.
Students using their Office 365 for Education organizational accounts will be automatically notified when OneNote class notebooks are shared with them. They can also go to their “Shared With Me” folder on OneDrive. Students will find any OneNote Class Notebooks assigned to them, as well as any other shared documents they have access to.
Sharing Notebooks With Teachers or Staff
05:50
Let’s return to the OneNote class notebook app to see how teachers can share notebooks with each other and school staff. Click or tap add or remove teachers. Select the notebook you want to share from the list.
You can add one or more teachers by typing their names here. In this case, enter two teachers’ names and then click or tap next. To confirm the new teachers’ names, click or tap Update. Now you can give the class notebook link to the teachers you just added.
Managing Notebooks
06:29
With the one note class notebook app you can manage all of the notebooks you’ve created from one place. Click or tap manage notebooks to take a look. Here you can review or modify the details of each of your class notebooks all in one place.
Let’s modify the class notebook that was just provisioned. Scroll up to continue.
You can rename an existing student section if you want. You can also add a new student section.
You can even add a Teacher Only section group in the notebook. A private space only teachers can see. Click or tap to enable a teacher only section group for this notebook.
If at any time you wish to prevent students from editing content in the collaboration space, simply click or tap to lock it. In this case, let’s unlock the collaboration space in this notebook.
Now click or tap Save to update the notebook. Class notebooks can be opened right from here. For now, let’s return to the new class notebook in the OneNote desktop application.
New Assignments
08:09
Let’s look at an example of how you might use a class notebook to distribute and grade a new assignment.
Navigate to the Content Library.
Let’s give the new assignment a name. For the sake of this guide, let’s paste in an existing assignment from another document. This assignment is now ready for students to begin working on. So let’s switch roles and take a look from a Student’s point of view.
Notice that this student can see only his own notebook and none of the other students notebooks. Students can grab homework from the Content Library, which is Read Only, but they must first copy the assignment page into their own notebooks before they can begin working.
Follow the prompts to copy the assignment.
Select the location in the student notebook in which to copy the assignment. In this case, select homework. Click or tap copy. Now the student has a copy of the assignment in the homework section of his notebook. He can get to work filling in the answers right on the page, and OneNote saves his work as he goes.
Now let’s switch back to the role of the teacher and review the assignment.
Review Assignments
09:57
When homework is ready to be graded, you can simply open up each student’s notebook and provide comments and feedback right on the assignment page.
Another great feature of the class notebook is the collaboration space.
You might use this section of the notebook for shared work, such as class projects.
To see an example, click or tap the research page tab.
This kind of sharing allows anyone to add content so students of different interests and abilities can work together with your guidance and oversight.
Teacher Only Section
10:41
Lastly, let’s take a quick look at the Teacher Only section group. This private workspace is where you and any other teachers with access to this notebook can draft new lesson plans, assignments, and other content you don’t want students to see.